
Permitted development extensions sit in a curious middle ground. They don’t require full planning permission, but they’re not invisible to the people who live next door. The prior approval process — especially for larger single-storey rear extensions under the neighbour consultation scheme — means your neighbours have a direct route to raise objections, and local authorities have to take those objections seriously. That’s where 3D Rendering for Permitted Development Extensions: How Architects Are Using Visuals to Manage Neighbour Consultations becomes genuinely practical rather than just a nice-to-have. A well-made render doesn’t just show what the extension looks like — it answers the exact questions neighbours and planning officers are most likely to ask, before they even ask them.
We work with residential architects across the UK, and the pattern we see is consistent. Architects who submit dimensionally accurate, contextually grounded renders alongside their prior approval applications tend to move through neighbour consultations with far fewer complications. The ones who rely purely on technical drawings — elevations, floor plans, sections — often find themselves fielding questions from neighbours who simply cannot visualise what a 3.5m rear extension actually means in practice. A worried neighbour looking at a site plan has no frame of reference. A photorealistic render showing the extension from the shared boundary line? That changes the conversation entirely.
This post covers how architects are using 3D visuals specifically for the permitted development process — which views matter most, what level of detail is actually needed, and the common mistakes that undermine an otherwise solid consultation strategy.
Why Neighbours Object — And What Visuals Do to Reduce That
Most neighbour objections to permitted development extensions aren’t about technical non-compliance. They’re about fear of the unknown. “Will it overshadow my garden?” “Will I be able to see it from my kitchen?” “How close does it come to the boundary?” These are visual questions, and technical drawings answer them poorly for anyone who isn’t trained to read them.
The neighbour consultation scheme under Class A permitted development gives adjoining owners 21 days to raise objections based on specific grounds — primarily impact on amenity. A blanket objection that says “we don’t like it” isn’t enough. But an objection that says “this will cast shadow over our outdoor space” carries weight, and councils are required to assess it. The problem is that neighbours rarely have the information they’d need to evaluate the real impact. They’re working from anxiety, not evidence.
A render provided proactively — shared with neighbours before the formal application is submitted — reframes the entire dynamic. Instead of a letter arriving through the door saying “your neighbour wants to build something,” the neighbour gets a clear visual showing exactly what that something looks like from their side of the fence. In our studio, we’ve found that architects who share a render early often get a far quieter consultation period. The visual answers the question before it becomes a formal objection.
This connects to a broader shift happening across the industry. Architects are increasingly replacing static drawings with rich visual communication at every consultation stage — something we covered in detail in our piece on why architects are replacing physical planning boards with interactive 3d renders at public consultation events.
3D Rendering for Permitted Development Extensions: Which Views Actually Matter
Not all renders carry equal weight in a neighbour consultation. The views that actually move the needle are the ones that directly address amenity impact — and that requires thinking from the neighbour’s perspective, not the client’s.
The Rear Boundary View
For a rear extension, the single most important view is the one that shows the extension from the shared boundary — typically at ground level, positioned where a neighbour would be standing in their own garden. This is the view that answers the question “how does it feel from next door?” You want to see the full mass of the extension in context, with accurate boundary treatment, existing vegetation, and the correct roof height relative to the neighbouring house.
The Aerial or Elevated Context View
A slightly elevated view showing the extension in relation to both properties and their gardens helps neighbours understand the footprint and proximity. This doesn’t need to be a full drone render — a 30 to 45 degree bird’s-eye perspective works well. It answers the footprint question clearly without requiring any technical drawing literacy. Aerial 3d rendering at this scale is particularly effective for tight suburban plots where boundary proximity is a key concern.
The Street Scene or Front Elevation View
Relevant primarily when the extension is visible from the street, or when there’s a shared front access. Less critical for purely rear extensions but worth including if the design makes any changes to the roofline or side return that neighbours might see from the road.
Shadow and Daylight Views
This is where the technical side matters most. If a neighbour raises a concern about overshadowing, the planning authority needs to assess it. Accurate sun studies — rendered at key times of day across different seasons — provide the most defensible visual evidence of real shadow impact. We’ve written in depth about daylight simulation in architectural rendering how accurate sun studies are helping developers beat planning objections, and the same logic applies to permitted development — maybe even more so, since the consultation window is tight and there’s little time to respond to objections with new evidence.
Level of Detail: What’s Appropriate for Permitted Development?
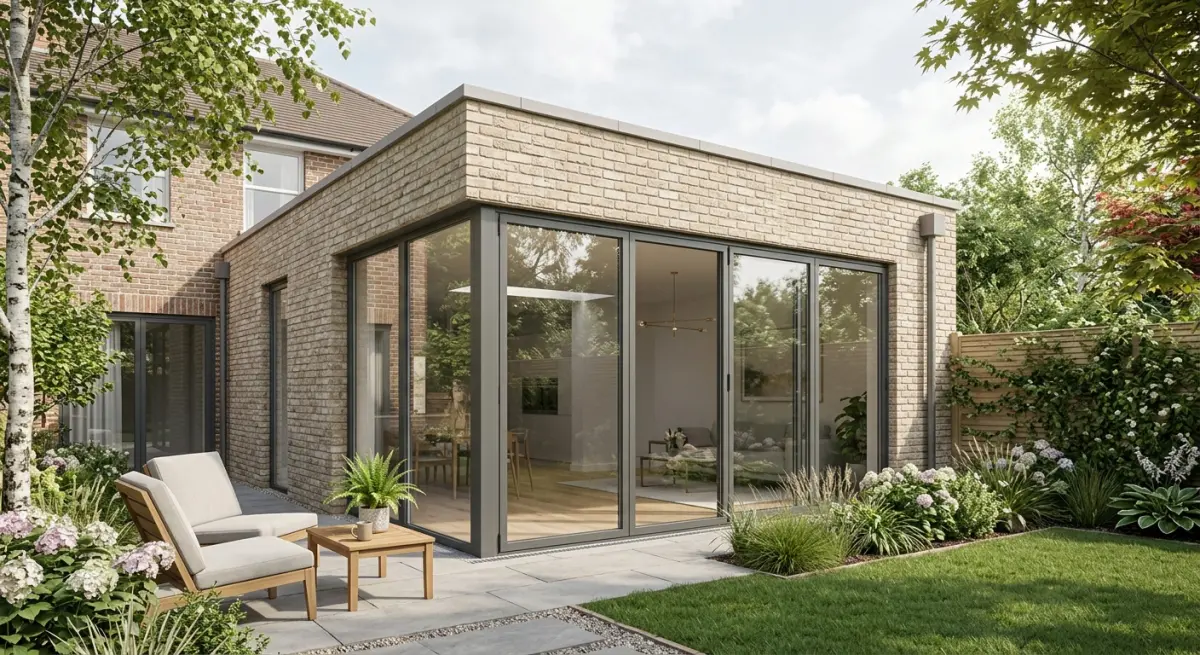
This is a question we get regularly. Clients sometimes assume that because it’s “just” a permitted development extension, the visuals don’t need to be particularly detailed. That’s not quite right. The purpose of the render here isn’t to win a design award — it’s to communicate clearly and credibly to a non-technical audience. That still requires a certain level of accuracy.
| Element | What’s Needed | Why It Matters |
|---|---|---|
| Extension massing and dimensions | Accurately modelled from approved drawings | Ensures the render reflects the actual application, not an approximation |
| Existing house and context | Modelled to match real property, including windows and materials | Builds credibility with neighbours who can recognise their street |
| Neighbouring properties | Approximate massing sufficient — doesn’t need to be exact | Establishes boundary relationships and visual context |
| Materials and finishes | Should match proposed specification — brick, render, cladding | Prevents accusations of misrepresentation if materials later differ |
| Vegetation and landscaping | Existing trees and hedges should be shown accurately | Vegetation often affects shadow and visibility — getting it right avoids disputes |
| Interior lighting | Minimal — focus is on exterior impact | Interior renders aren’t typically relevant to neighbour consultation |
For a deeper dive on how detail level affects the appropriate use of renders at different project stages, our guide on what level of architectural detail do you actually need in a 3d rendering lod 100 to lod 400 explained for developers covers the LOD spectrum in a way that maps directly to this kind of decision-making.
How Architects Are Packaging Renders for Consultation
The render itself is only part of the solution. How it’s packaged and presented to neighbours and planning officers matters too. We’ve seen architects use visuals in a few distinct ways during the permitted development process.
Pre-consultation packs: Some architects produce a simple one or two page visual document — two or three renders plus a brief written explanation — and hand-deliver it to adjoining neighbours before submitting the prior approval application. This is the most effective approach we’ve seen for avoiding formal objections. It demonstrates goodwill, gives neighbours something concrete to assess, and removes the element of surprise.
Planning submission appendix: Including renders as a supplementary document within the prior approval submission itself gives planning officers something to reference when assessing neighbour objections. It also signals that the applicant is being transparent about the design.
Response documents: If a neighbour does object, a well-prepared render showing the specific concern — shadow impact, visibility, boundary proximity — can be submitted as part of the applicant’s response. This is where sun studies and accurate boundary views earn their keep.
It’s also worth thinking about file format at this stage. A high-resolution JPEG is fine for a printed pack. A PDF with embedded images works for a planning portal upload. If you’re sharing digitally with neighbours, a clear compressed file that opens easily on a phone or laptop is more likely to be read. The full considerations around file choice for these submissions are covered in our post on what file formats should a 3d rendering studio deliver and why it matters for print web and planning submissions.
What Architects Get Wrong — Real Observations

A few patterns come up repeatedly when architects get the visual strategy wrong on permitted development applications.
Using renders that make the extension look smaller than it is. A wide-angle lens, a low-ground camera position, or simply omitting neighbouring properties from the frame can make an extension appear less imposing than it actually is. Neighbours are surprisingly good at spotting this — and if they feel the visuals are misleading, they dig in harder. Accuracy builds trust. We always recommend showing the extension at a natural eye-level view from where a neighbour would actually stand.
Showing ideal lighting conditions only. A summer midday render that makes everything look bright and open doesn’t serve the neighbour consultation well. The concern is usually about winter shadow at 3pm, not July at noon. Showing realistic seasonal lighting — even if it’s less flattering — demonstrates that the architect has genuinely assessed impact rather than just produced attractive images.
Skipping the shared boundary view entirely. It’s tempting to show the extension from the client’s own garden — it looks good, it shows the design well. But neighbours are the ones who need to be persuaded, and they want to see it from their side. The view from the adjoining property is the most important one in this context.
Waiting until there’s a problem. Renders commissioned reactively — after an objection has already been filed — are harder to use effectively. The objection is on record, the neighbour is already in an adversarial mindset, and the planning officer has to weigh up competing documentation. Proactive use of visuals, before the formal application period starts, is consistently more effective.
When Permitted Development Visuals Overlap With Broader Design Communication
For self-build clients and custom housebuilders, the permitted development process is often just one phase of a longer design journey. Visuals produced for the neighbour consultation can frequently be repurposed for the client’s own decision-making, contractor briefing, or even sale of the property post-completion. Our guide on 3d rendering for selfbuild and custom housebuilder clients what visualisations are worth commissioning at each design stage covers exactly how to think about visual output across the full project timeline — and the permitted development phase fits neatly within that framework.
The same exterior renders used in a neighbour pack can also serve as the basis for a residential exterior rendering that the homeowner keeps for planning records, mortgage valuation, or future resale. One commissioning decision, multiple uses — that’s good project management.
Conclusion
The neighbour consultation process for permitted development extensions is short, but the consequences of getting it wrong can stretch a project out by months. Architects who use 3D Rendering for Permitted Development Extensions: How Architects Are Using Visuals to Manage Neighbour Consultations as a proactive communication tool — not a last resort — consistently report smoother consultations, fewer formal objections, and faster prior approval outcomes. The renders don’t need to be elaborate. They need to be accurate, honest about the real impact, and positioned from the neighbour’s point of view rather than the client’s.
If you’re working on a permitted development extension and want to commission renders that are genuinely built for this purpose — accurate massing, correct boundary views, daylight studies — get in touch with our team at contact us. We work with residential architects across the UK and understand exactly what planning officers and neighbours need to see.
Frequently Asked Questions
Do I need planning permission for a permitted development extension if I use 3D renderings?
No, 3D renderings do not replace or remove the need to comply with permitted development rights rules, but they can help clarify your project during the neighbour consultation process. Under permitted development, you may still need to submit a prior approval application, and 3D visuals are increasingly used to present proposals clearly to neighbours and councils during this stage. They help demonstrate that the extension meets size, height, and boundary requirements without requiring full planning permission.
How do architects use 3D renderings during neighbour consultations for permitted development extensions?
Architects use photorealistic 3D renderings to show neighbours exactly how a proposed extension will look from street level, garden views, and adjoining properties before any work begins. These visuals reduce misunderstandings and objections by replacing vague written descriptions with clear, accurate representations of the finished structure. Many practices now share interactive renders or walkthroughs during consultation meetings to address concerns proactively and build goodwill with neighbours.
Can 3D renderings help reduce neighbour objections to permitted development extensions?
Yes, studies and architectural practices report that presenting high-quality 3D renderings during consultation significantly reduces the number and severity of neighbour objections. When neighbours can clearly see materials, scale, and shadow impact rather than interpreting technical drawings, they are far less likely to raise concerns based on assumption or misinterpretation. This visual transparency builds trust and often leads to smoother, faster approval processes under the prior approval notification scheme.
What types of 3D visuals are most effective for permitted development extension consultations?
Photorealistic exterior renders showing the extension in context with neighbouring properties are the most effective visuals for consultations, as they provide the most relatable and realistic view for non-technical audiences. Aerial or bird's-eye renders are also useful for showing how the extension sits within the plot and how it relates to neighbouring gardens and boundaries. Some architects supplement these with before-and-after comparisons or sun and shadow studies to address the most common neighbour concerns about light and overlooking.
How much does it cost to get 3D renderings done for a permitted development house extension?
The cost of 3D renderings for a residential permitted development extension typically ranges from £300 to £1,500 depending on the complexity of the design, the level of photorealism required, and whether animations or multiple viewpoints are included. Basic exterior renders suitable for neighbour consultations sit at the lower end of this range, while detailed photorealistic visualisations with landscaping and context can cost more. Many architects now include basic rendering as part of their design fee, recognising that visuals reduce delays and disputes that would otherwise cost clients more in the long run.