One of the most common questions we get from property developers and architects — before they even send us their drawings — is some version of: “How detailed does this actually need to be?” It’s a fair question, and the answer genuinely depends on what you’re trying to achieve. Understanding what level of architectural detail do you actually need in a 3D rendering: LOD 100 to LOD 400 explained for developers is not just useful — it can save you time, money, and a lot of unnecessary back-and-forth. The Level of Detail (LOD) framework, originally developed for BIM workflows, has become a practical way for developers and 3D artists to speak the same language when scoping a rendering project. Let me break it down the way we actually use it in our studio.
The LOD scale runs from 100 to 500, but for architectural rendering purposes, the range you’ll realistically work within is LOD 100 through LOD 400. Each level represents a different degree of geometric complexity, material specificity, and spatial accuracy in the 3D model. Getting this calibration right is what separates a rendering that serves its purpose from one that either wastes budget on unnecessary detail — or worse, fails to convince its intended audience because it looks unfinished.
What Is LOD in 3D Rendering and Why Does It Matter for Developers?
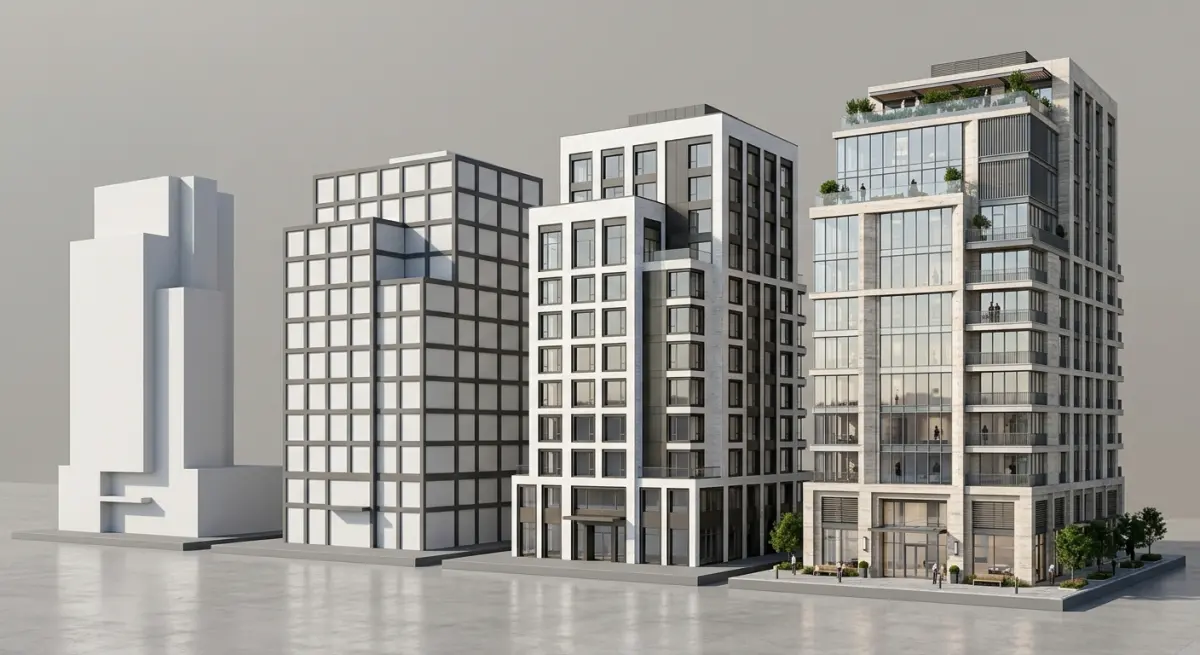
LOD stands for Level of Detail. In BIM, it defines how much information a building element carries at each stage of design. In 3D rendering, we use it slightly differently — it describes how fully resolved the model is, visually and spatially. A low-LOD model has rough massing but no defined materials or joinery. A high-LOD model has correctly specified cladding panels, window profiles, door hardware, and accurate room layouts with furniture at scale.
Why does this matter for developers specifically? Because your rendering needs are directly tied to what decision you’re trying to support. Planning authority, investor presentation, sales brochure, and construction-stage communication all require different visual fidelity. Spending LOD 400 budget on a pre-application planning image is like commissioning a fully detailed architectural drawing when a sketch would do. Conversely, using a rough LOD 100 mass model for off-plan buyer marketing is a common mistake that undermines confidence and slows sales.
LOD 100: Conceptual Massing — What It Is and When It’s Enough
At LOD 100, your 3D model is essentially a solid massing study. Buildings are represented as simple geometric forms — blocks, volumes, basic footprints. There’s no material specification, no window detail, no roof elements beyond a basic shape. Think of it as a physical planning model translated into a digital file.
This level is genuinely useful for early-stage feasibility work and urban planning contexts. If you’re presenting to a local authority at pre-application stage to demonstrate massing in context, an LOD 100 render — especially an aerial or bird’s eye view — can do the job cleanly. For this type of work, aerial 3d rendering at a conceptual detail level works well because the camera distance naturally reduces the need for material resolution.
What it won’t do: impress investors, sell apartments, or win a design competition. If you try to use LOD 100 imagery in a sales context, buyers will see blobs, not homes.
LOD 200: Schematic Design — The Planning Sweet Spot
LOD 200 is where most planning-stage renderings live. The building has defined geometry: window openings, floor counts, roof pitch, entrance features, and a general material palette. Materials are approximate — you might show the building in brick, but it’s a generic brick texture rather than a specific product. Landscaping is indicative. The surrounding context starts to carry meaning.
In our experience, this is the level most planning committees actually need. They want to understand scale, massing, materiality in general terms, and how the building sits in its setting. They are not evaluating whether you’ve specified Ibstock Antique Red or Wienerberger Olde English. That said, if your project is in a sensitive conservation area or faces design scrutiny, pushing towards the upper end of LOD 200 — with more deliberate material choices and contextual accuracy — does help. Our post on exterior 3d rendering for planning permission what councils actually look for in visualisations goes into the specific visual requirements in more detail.
For residential schemes, residential exterior rendering styles compared photorealistic vs sketch vs watercolour which wins planning committees is worth reading — the style of render (not just LOD) also affects how planners receive it.
LOD 300: Design Development — Where Marketing and Investment Imagery Lives
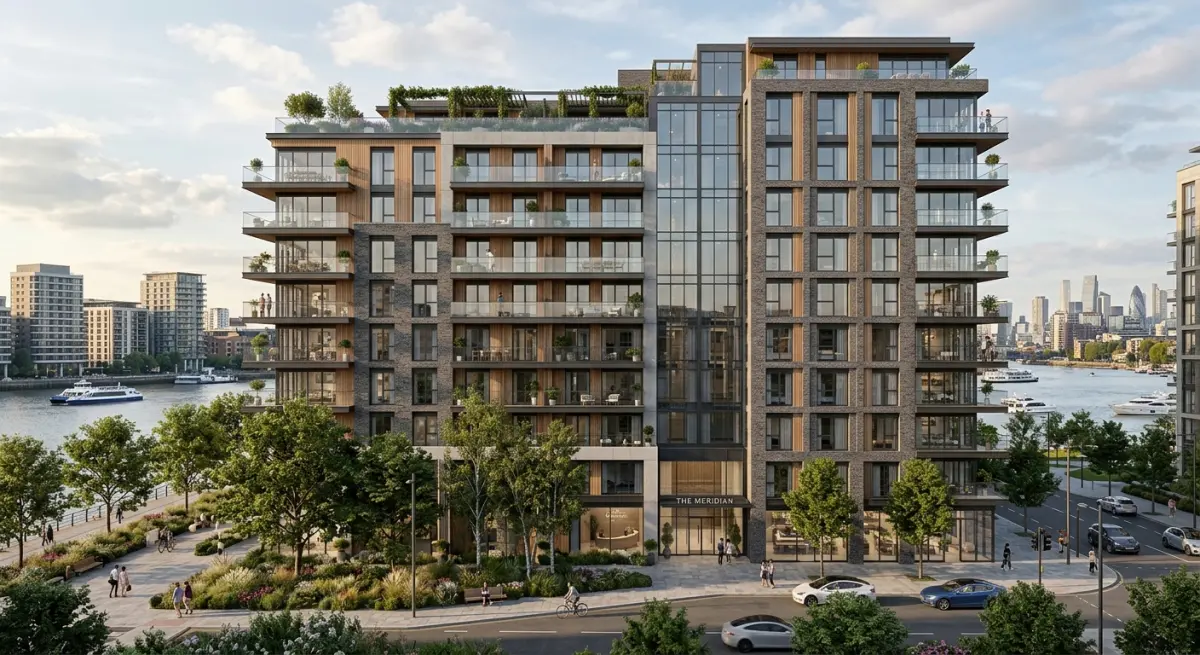
LOD 300 is where things get genuinely photorealistic. The model now contains accurately sized and positioned elements: specific window systems, door types, cladding panel layouts, defined roofline details, parapet heights, balcony railings, and material selections tied to real products or at least realistic proxies. Interior volumes are correctly proportioned. Room layouts and furniture placement are accurate to the floor plan.
This is the standard for most marketing-grade renders. Off-plan residential sales, investor presentations, sales brochures, website imagery — all of these typically require LOD 300 fidelity. At this level, a buyer looking at a kitchen render can understand ceiling height, island dimensions, the quality of the finishes, and the way light moves through the space. That’s what builds confidence in an off-plan purchase.
We use LOD 300 as our default for residential interior rendering and most commercial exterior rendering work. It’s the level where lighting simulation, material accuracy, and camera composition all come together into something that actually sells.
For developers looking at mixed-use or student accommodation projects, the detail level at LOD 300 is usually what investors and institutional partners require. The question of what those audiences specifically want to see is covered well in our post on 3d rendering for student accommodation developments what pbsa investors and university partners need to see at preapproval stage.
LOD 400: Construction-Ready Detail — When and Why Developers Commission It
LOD 400 is a high-resolution model where every building component is accurately represented: specific manufacturer products, exact dimensions, installation methods, curtain wall mullion profiles, specific tile layouts, joinery detail. This level of model is rare in pure rendering work — it’s more native to BIM and shop drawing production. But it does appear in rendering contexts, and when it does, the output is extraordinary.
We typically see LOD 400 rendering requests in a few scenarios: luxury residential where material specificity is a selling point; hospitality projects where investors need to visualise exact spatial quality before committing; or commercial fit-out contexts where the render is doubling as a design coordination tool. If you’re curious about how detailed commercial interior work gets used in real pitches, our post on how retail fitout brands use commercial interior renderings to pitch franchise rollouts to landlords and area developers shows how that level of specificity translates into commercial persuasion.
The honest caveat here: LOD 400 takes significantly longer to produce and costs more. If your brief doesn’t genuinely require it, you’re paying for detail that the camera won’t even capture at typical render resolutions.
LOD vs Render Quality: The Distinction Most Developers Miss
This is the confusion we encounter most often. Developers sometimes assume that a high-quality, photorealistic rendering automatically means a high-LOD model. That’s not quite right. Render quality — lighting, atmosphere, post-production, camera angle — is a separate layer from model detail. You can produce a stunning, moody, atmospheric exterior render from an LOD 200 model if the lighting simulation and composition are strong. You can also produce a technically accurate but visually flat image from a meticulously detailed LOD 400 model if the lighting and scene are handled poorly.
What makes a rendering look photorealistic is explored in depth in our guide on what makes a commercial exterior rendering look photorealistic lighting materials and context explained — it’s worth reading alongside this one. The short version: LOD sets the accuracy floor; lighting and artistic direction determine the ceiling.
A Practical LOD Decision Guide for Developers
| Use Case | Recommended LOD | Key Requirement |
|---|---|---|
| Pre-application / feasibility | LOD 100–150 | Massing in context, basic scale |
| Planning application | LOD 200 | Material palette, window positions, site context |
| Investor / funding pitch | LOD 200–300 | Credible quality cues, spatial accuracy |
| Off-plan marketing / sales brochure | LOD 300 | Photorealistic materials, accurate interiors |
| Luxury residential / hospitality | LOD 300–400 | Product-level material accuracy, joinery detail |
| Design coordination / client sign-off | LOD 300–400 | Accurate proportions, finishes, spatial decisions |
What Developers Get Wrong When Briefing LOD
The most common mistake is requesting the highest possible detail without considering how the render will actually be used. A developer will sometimes ask for full interior renders with product-accurate finishes before the design is even frozen — meaning we build an LOD 350 model, then get three rounds of changes because the architect is still evolving the kitchen layout. That’s expensive iteration that could have been avoided by starting at LOD 200 for early stakeholder alignment and only going deep on detail once the design is confirmed.
The second mistake is under-specifying for the audience. Sending an LOD 150 render to a high-net-worth buyer for a luxury apartment development signals uncertainty. Your buyer’s purchase decision is partly emotional — they need to see quality cues. Rough geometry doesn’t convey that. If you’re unsure where your project sits on this spectrum, our guide on how to brief a 3d rendering studio what architects and developers need to prepare before project kickoff walks through exactly what information helps us (and any studio) calibrate the right approach from day one.
The third mistake — less common but worth flagging — is confusing LOD with the number of views. Getting four hero exterior shots at LOD 300 is not the same as getting twenty views at LOD 200. Both can be appropriate; they serve different purposes. Think about your audience, your stage in the development lifecycle, and the decision you need them to make.
Getting the LOD Right Is About Matching Detail to Purpose
Understanding what level of architectural detail do you actually need in a 3D rendering: LOD 100 to LOD 400 explained for developers ultimately comes down to one principle: the right detail level is the one that makes your audience confident — no more, no less. Over-engineering detail at the wrong stage is waste. Under-delivering detail when it matters is risk. In our studio, the first question we ask any new project isn’t “what do you want it to look like?” — it’s “who is going to see this, and what do you need them to do after they see it?” The LOD decision flows naturally from that.
If you’re working on a development and want to talk through what level of detail makes sense for your specific stage and audience, contact us at 360archviz.com. We work with developers globally and we’re happy to give you a straightforward recommendation before you commit to a brief.
Frequently Asked Questions
What is the difference between LOD 100 and LOD 400 in 3D architectural renderings for real estate developers?
LOD 100 represents conceptual massing models with approximate dimensions and no detailed components, used primarily for early feasibility studies and investor presentations. LOD 400 includes full fabrication-level detail with precise geometry, materials, connections, and installation specifications, making it suitable for construction documentation and contractor coordination. Developers typically use LOD 100 to 200 for marketing renderings and LOD 300 to 400 only when technical accuracy is required for permitting or construction.
Which LOD level is best for real estate marketing and pre-sale 3D renderings?
LOD 200 to LOD 300 is the sweet spot for real estate marketing renderings because it provides enough visual detail to showcase materials, fenestration, and spatial relationships without the excessive cost of higher-detail models. At this level, renderings look photorealistic and compelling to buyers while keeping production timelines and budgets manageable. Going beyond LOD 300 for purely marketing purposes offers diminishing visual returns that most buyers and investors won't notice or value.
How does the level of architectural detail in a 3D rendering affect production cost and timeline?
Moving from LOD 200 to LOD 400 can increase modeling time by 300 to 500 percent because each additional level requires exponentially more geometry, texture work, and coordination with engineering data. A typical LOD 200 exterior rendering might take 2 to 4 days to produce, while a fully detailed LOD 400 model used for BIM coordination could take weeks. Developers should match the LOD to the decision being made, using lower levels early in design phases to control costs and reserve higher detail for construction-stage deliverables.
Can you use the same 3D model at different LOD levels throughout a development project?
Yes, progressive LOD workflows allow development teams to start with a low-detail concept model and incrementally add information as the design matures, avoiding redundant modeling work. Many BIM platforms like Revit and ArchiCAD support this approach, letting teams upgrade the same model from LOD 100 through LOD 400 across project phases. This strategy saves significant time and budget by reusing geometry while only investing in higher detail when project milestones and stakeholder needs actually require it.
What level of detail do planning departments and permit authorities typically require in architectural 3D renderings?
Most municipal planning and zoning departments require renderings at approximately LOD 200 to LOD 300, enough to evaluate massing, facade materials, roofline, and contextual fit within the surrounding neighborhood. Some jurisdictions with design review boards may request higher fidelity at LOD 300 to verify specific material specifications and window proportions. Developers should confirm local requirements early, as submitting overly simplified LOD 100 visuals can delay approvals while unnecessarily expensive LOD 400 detail is rarely mandated for permitting purposes.